 
This tutorial and the mask used for this lesson are © Designwell and may not be copied or uploaded to your own server or used as your own material. You're not allowed to link this lesson without my permission. When you see this lesson with no source, then I would appreciate it if you want to inform me. If you want to link this lesson, please send me an email.
This lesson was written in PSP 9, but can also be made in the other versions with making small adjustments.
Thank you Zial for translating this tutorial!
|
What you need
|
| - |
Paint Shop Pro -
Click here |
| - |
Goldpattern -
Click here (*button choose your 'image save as...' or use your own image and place this in your folder for patterns)) |
| - |
Filter Visual Manipulation (Vismanfilter) -
Click here for the Visman filters of
here
for just the 'Transmission effect we use for this lesson |
| - |
Filter FM Tile Tools -
Click here |
| - |
Filter (NVR) BorderMania -
Click here |
| - |
NavyBlueMask -
Click here
for
© Designwell's
NavyBlueMask
|
| - |
Tube/image of your choice* -
Click here
for the tube I've used, including the little anchor
|
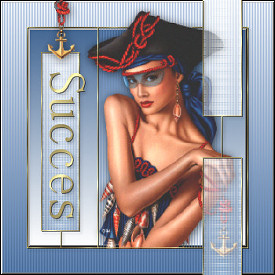
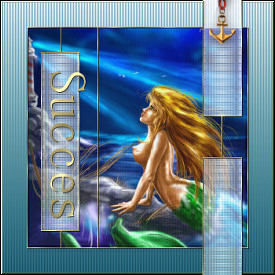
* In this tutorial we make the left example on top of this page with a tube.
Step 1
Open the mask we will use (NavyBlueMask.psp) in PSP, close the 'copyright' layer by clicking on the eye.
Open tube 'Navyblue.psp with the anchor' in PSP, or your own tube or image.
Minimize both images.
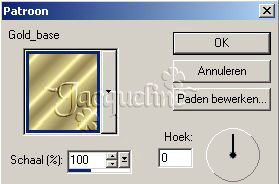
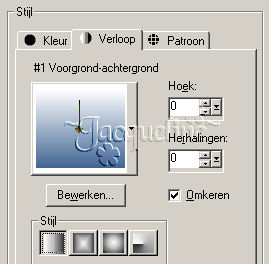
Set your foreground color to white - your background color to a darker color that matches your tube. I used color #426693. Set your foreground to gold pattern 'Gold base' (see image below) - set your background to 'gradient' with these settings:
Step 2
Open a new White image of 350x350 pixels.
Flood fill your image with your gradient.
Layers - New raster layer - name this layer 'Frame'.
Selections - Load/save selection - Load selection from Alpha channal - select 'GoldEdges' as shown below:
Flood fill the selection with your gold pattern.
Selections - Select none.
Effects - 3D Effects - Drop shadow:
- Vertical and Horizontal: 1
- Opacity: 50
- Blur: 0
- Color: black
- Shadow on new layer: CHECKED
Activate layer 'Frame'.
Effects - 3D Effects - Drop shadow:
- Vertical and Horizontal: 3
- Opacity: 20
- Blur: 5
- Color: black
- Shadow on new layer: CHECKED
Activate again layer 'Frame'.
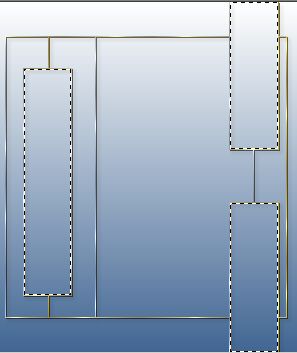
Activate your Magic wand (Feather and Tolerance to 0).
Click inside the golden rectangles (see picture):
With the selection running, select the bottom (background layer).
Layers - New raster layer.
Flood fill with white (change your foreground from pattern to color).
Keep the selection.
Effects - Texture effects - Blinds:
- Width: 2
- Opacity: 60
- Color: #426693 (or the color you use for background color)
- Light from left / top - checked.
Selections - Select none.
Set the opacity of this layer to 50%.
Layers - New raster layer.
Flood fill with your background pattern.
Effects - Plugins - Visual Manipulation - Transmission - with these settings:
- Line Width: 6
- Contrast : 0
- Offset: 40
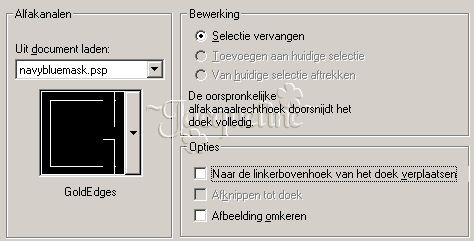
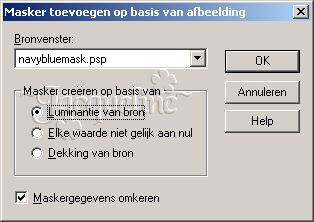
Layers - New masker layer - From image -
find 'navybluemask.psp' - with these settings:
Layers - Merge - Merge group.
Effects - Plugins - FM Tile Tools - Blend Emboss - default settings. Repeat this effect 1x.
Set the Blend mode of this layer to 'Screen'.
Activate the bottom 'background' layer.
Step 3
Change your fore-backgroudcolor.
Selections - Load/save selection - Load selection from Alpha channel - select 'Border'.
Flood fill the selection with your background gradient.
Effects - Plugins - BorderMania - 3D BW Raised #1 - Border width 1 - Notch Corners checked.
Selections - Invert.
Effects - Texture effects - Blinds - with these settings:
- Width: 2
- Opacity: 60
- Color: #426693 (or the color you use as background color)
- Light from left/top - checked.
Keep the selection.
Effecten - Plugins - BorderMania - 3D BW Raised #2 (Border width 1 - Notch Corners checked).
Selections Select none.
Activate your top layer - close the bottom one (background).
Layers - Merge - Merge visible.
Open the bottom layer.
Stap 4
Maximize the tube from this lesson or your own tube.
Edit - Copy.
Back to your main image.
Activate your bottom layer.
Edit - Past as a new layer
Set the tube/image on its place.
If necessary you can resize your tube by:
Image - Resize (Note: All layers NOT checked).
*If you use an image instead of a tube or want a part of your tube that falls outside the frame, you can widen that section - do the following:
Selections - Load/save selection - Load selection from Alpha channal - select 'Border'.
Selections - Invert - hit the delete button or use your Eraser tool to do this manually.
Activate your top layer.
Activate your Eraser tool and erase that part of your tube that you want to be 'under' the gold edge.
I wiped the following piece of the gold edge:

To place the anchor repeat this step (ps. don't forget to activate the 'anchor' layer before your copy it.
Step 5
And finally the text :)
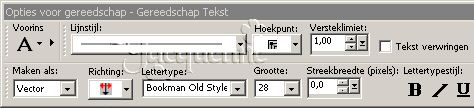
Activate your Text too - with these settings:
To rotate your text, go to:
Image - Rotate - Free rotate - Right - 90 - nothing checked.
I gave the text the same 2 drop shadows as described in step 2.
Set the text on it's place and your 'Navy Blue Tag of Frame' is ready!
Enjoy this lesson!
April 2005
|